 YESKAMO App Docs
WiFi Floodlight Camera NVR System (W05-US3004-1T)
Quick user guide for the YESKAMO W05 wireless WiFi floodlight camera NVR security system — parts, NVR connection, app pairing, motion alerts, floodlight modes and adding cameras.
The YESKAMO W05 is a wireless WiFi floodlight camera NVR security system. The bullet cameras pair to a Network Video Recorder (NVR) over WiFi, record locally to the NVR's hard drive, and can be viewed remotely on the phone app once the NVR is online. This quick guide covers the camera and NVR parts, system connection, app pairing, motion alerts and the floodlight settings.
Note
- Thanks for purchasing this product. YESKAMO is committed to providing our customers with a reliable security solution and protecting your property at all times.
- This is the fast setup guide, which only helps you get familiar with this product quicker. For more information about the product, please refer to the full user manual.
- Though we apply every effort to make the manual complete and accurate, there could still be some discrepancies due to the product's timely update. Detailed information is in accordance with the final products.
Safety caution
- "Wireless" only means there are no cables between the camera and the NVR base, but the whole camera system needs to be plugged into a power socket for power supply.
- Please use the included power supply with the product to prevent damage to the product.
- Please avoid any avoidable obstacles and electromagnetic products between the camera and the NVR for a better signal.
- All man-made damages are outside the scope of the free warranty.
Product introduction
WiFi Floodlight Security Camera
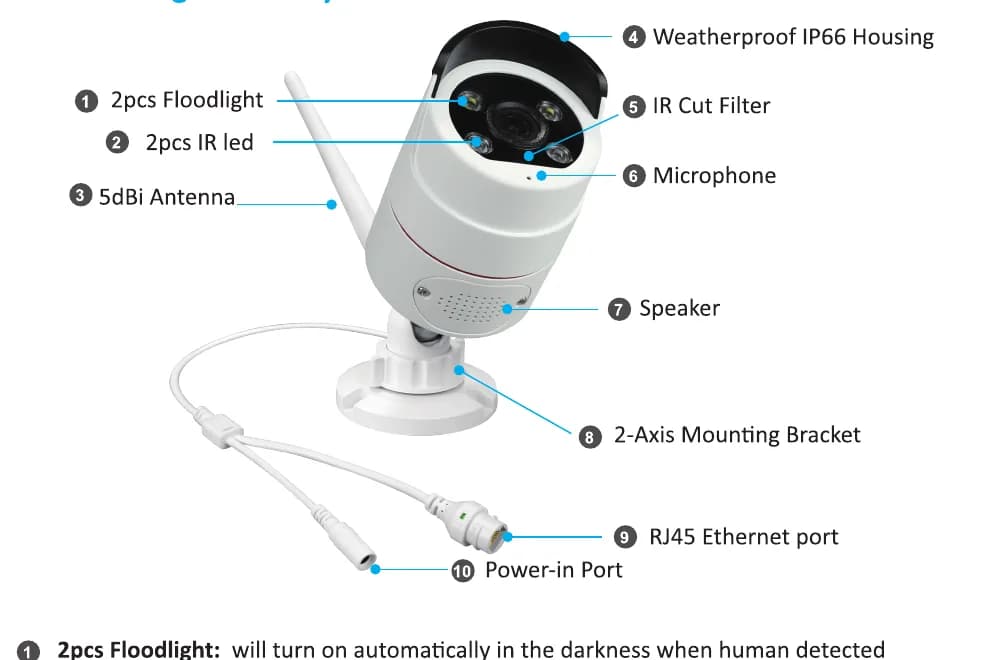
- 2pcs Floodlight: will turn on automatically in the darkness when a human is detected.
- 2pcs IR LED: IR LEDs will automatically switch on at darkness for night vision.
- 5dBi Antenna: receives the WiFi signal from the NVR recorder.
- Weatherproof IP66 Housing: working temperature -20℃/-4°F to 60℃/140°F.
- IR Cut Filter: auto switch day/night.
- Microphone: pick up audio.
- Speaker: transmit sound.
- 2-Axis Mounting Bracket: adjust the installation angle, with a vandal-proof inside cable. 360° all-round swiveling and 90° up-down adjusting.
- RJ45 Ethernet port:
- A: pair / match-code the camera with the NVR when the camera loses connection.
- B: hard-wire the camera to the NVR or router to get a stable signal (DO NOT CUT IT OFF).
- Power-in Port: connect with the provided 12V 1A plug for power supply.
Note
It's suggested to install the camera under the roof to avoid unnecessary wearing and tearing.
Network Video Recorder (NVR)
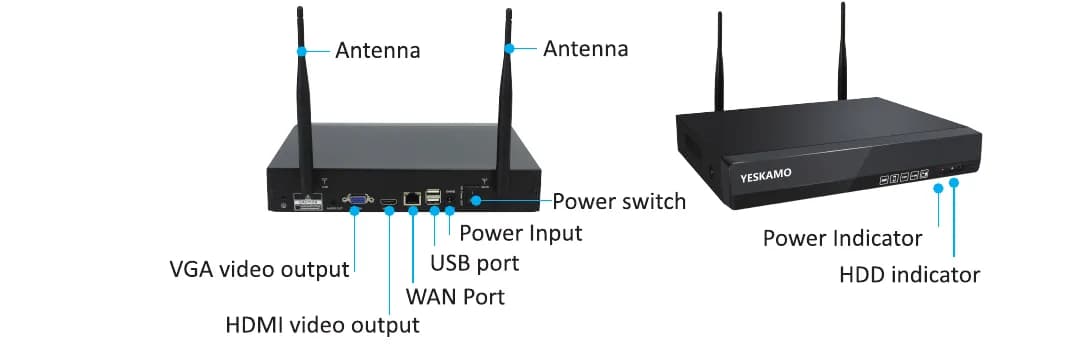
- VGA video output: connect the NVR to the VGA input port of your TV/monitor for video and audio output (VGA cable not included).
- HDMI video output: connect the NVR to the HDMI input port of your TV/monitor (HDMI cable not included).
- WAN Port:
- A: connect to the router with an Ethernet cable for remote viewing.
- B: when you add a new camera to the YESKAMO NVR recorder, or your camera loses connection with the NVR recorder, you need this Ethernet port to pair the camera with the NVR recorder.
- USB port: for USB mouse control; USB flash-drive port for video footage backup and system upgrading.
- Power Input: connect the provided 12V 2A/3A adapter for power supply.
- Power Switch: turn on/off the NVR system.
- Antenna: release a strong wireless signal from the NVR recorder.
- Power Indicator: lights on when the NVR has power supply.
- HDD indicator: lights on when the hard drive is recording.
Connection instruction (Model No.: W05-US3004-1T)
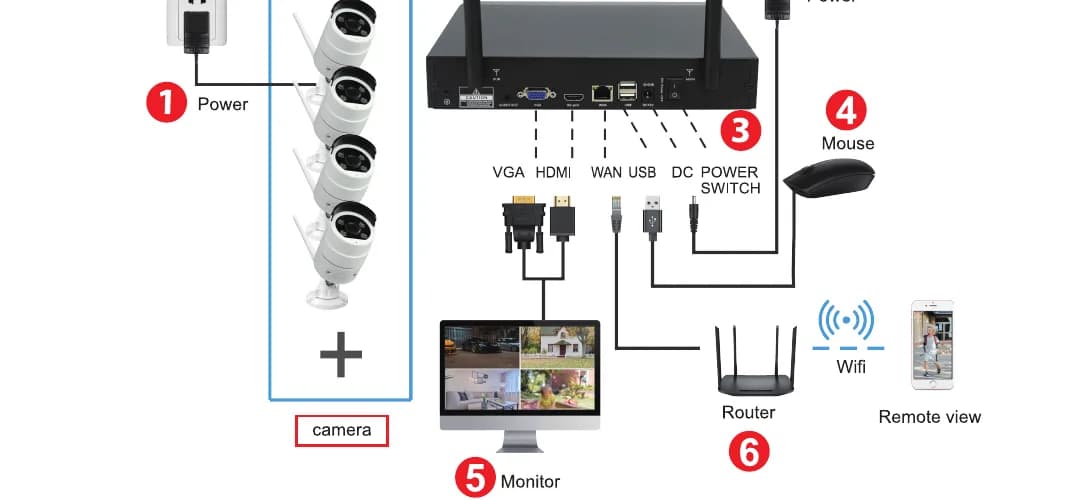
Plug the camera into a power socket with the provided 12V 1A adapter.
Plug the NVR into a power socket with the provided 12V 2A/3A adapter.
Switch the power button to "On".
Plug the mouse into the NVR.
Connect the NVR recorder to the TV/Monitor with an HDMI/VGA cable (not included).
Use an Ethernet cable to connect the WAN port of the NVR to a LAN port of the router, to make the system online if you want to remotely view the cameras on the phone app. (Skip it if you only want to view local videos on the monitor.)
User name: admin Password: No password (leave it blank by default).
Note
- The laptop can't be used as a monitor directly — please use your TV or desktop's monitor for local viewing.
- The NVR recorder has a built-in router, and the cameras receive the wireless signal from the NVR. So it is suggested to place the NVR at the center of the monitoring area, and avoid any avoidable obstacles between the cameras and the NVR, and keep the antenna of the camera parallel with the NVR's antenna.
- Please test that the cameras work before installation, to ensure they work fine.
What if my screen does not display the image of the camera?
The default output resolution for the NVR recorder is 1280x1024, which may not be compatible with some screens and will be black on the monitor. Please adjust the resolution of the system to match your monitor as in the steps below:
Connect the NVR to any other screen via a VGA cable to enter the system (or you may also try any other screen via HDMI to see if you can enter the NVR system).
Once you are able to log in / access the NVR system, click the right mouse button to enter the Main Menu > System Setup > General Setup > Display Resolution > 1080P@60Hz, then apply to save it.
Connect the NVR to your primary monitor via an HDMI/VGA cable. It should now work with the primary screen.
NVR optional output resolutions: 1024x768, 1280x1024, 1366x768, 1440x900, 1080P@50Hz, 1080P@60Hz (change the output resolution to match your primary monitor).
Remotely view the cameras on the phone

1) Make sure the NVR system is ONLINE
Connect the WAN port of the NVR system to a LAN port of the router with an Ethernet cable, then the NVR system will be ONLINE.
Right-click the mouse to enter Main Menu > Fast Network > Cloud (P2P) > ONLINE.
2) Download the free app
Search for the free app "YESKAMO" or "EseeCloud" in the App Store or Google Play. (The phone app is updated sometimes. If your phone app menu is different from the menu in this manual, please contact us to get the latest user manual.)
Note
Not sure which app this system uses? See YESKAMO app vs EseeCloud for how the apps relate.
3) Create an account and log in to the phone app
Register an account with your email address / phone number and a password. A verification code will be sent via text.
4) Add the Cloud ID
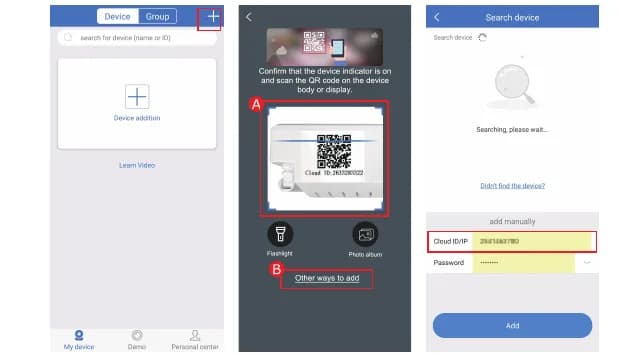
- A: Enter the app > tap the "+" in the top-right corner or the center of the screen > Scan the Cloud ID.
- B: Enter the app > tap the "+" in the top-right corner or the center of the screen > "Other ways to add" > input the Device Cloud ID > the default password is no password > tap "Add" and "Complete" to finish.
Where to find the Cloud ID:
- A: Right-click the mouse to enter Main Menu > Fast Network > Cloud (P2P).
- B: The right-bottom corner of the system (on-screen preview).
- C: The label on the NVR system.
| Field | Value |
|---|---|
| Name of device | Customize the system name (such as home, office, room…). |
| User Name | Default is admin (the same as your NVR system). |
| Password | Default is no password — leave it blank/empty (same as your NVR system). |
5) Remotely view the cameras via phone
Double-tap the screen, and you can view the cameras anywhere, anytime.
6) Two-way audio communication
- Turn on the "speaker" button at the top-right corner of the phone app, and you can hear the audio from the camera side.
- Tap the "microphone" button to enter the chat screen, then press and hold the "microphone" button so you can talk back to the camera side.
- Tap the "hang up" button to return to the preview screen.
Note
Only one user can use the "microphone" at one time; others can use the microphone when the first person hangs up.
How to enable the siren alarm from the camera side?
There are 5 types of alerts for motion detection: Buzzer, E-Mail Notice, phone app notification (APP Alarm), Full Screen and IPC Alarm.
| Alert type | Function |
|---|---|
| Buzzer | The NVR monitor will beep "didi" when motion is detected. |
| E-Mail Notice | Enable it, and then you are able to set up and receive email alerts. |
| APP Alarm | Enable it, and the system sends app notifications when motion happens. |
| IPC Alarm | Enable it to allow the camera to make a siren alarm sound. |
| Full Screen | The monitor auto-shows full screen when the camera detects motion. |
Take the IPC alarm as an example — it sounds a siren alarm from the camera side when motion is detected. Right-click the mouse to enter Main Menu > System Setup > Channel Setup > Video Detection > select channel and click "Enable" > check/enable "IPC Alarm" (IPC Siren) > click "Apply" to save the setting.
Note
- If you choose phone app or email alert for this camera, please make sure your camera system is online.
- If you want to set up the same alerts for all channels, please repeat the above steps or click "Copy to all".
How to manually turn off the floodlight at night?
The floodlight on the camera will turn on when it detects human motion at night, thus offering true-color videos. The floodlight does not turn on during the daytime by default, but you can customize the IR-Cut mode to set up an on/off schedule for the light, as in the steps below:
Before customizing the IR-Cut mode for a selected channel, please double-click the selected channel to enter full-screen mode. Right-click the mouse to enter Main Menu > Color Adjustment > IR-Cut mode: Infrared, Daylight, Night, Full Color, Smart Mode.
| IR-Cut Mode | Day | Night |
|---|---|---|
| Infrared | Color picture | Black & white; floodlight will never turn on. |
| Daylight | Color picture | Totally black once ambient light is insufficient; floodlight will never turn on. |
| Night | Black & white | Black & white; floodlight will never turn on. |
| Full Color | Color picture | Color picture; floodlight always turns on at night. |
| Smart | Color picture | Black & white when no one passes by, and the floodlight switches on to offer color video once someone passes by. |
Note
- A: The light of the floodlight camera lasts for about 20 seconds.
- B: The time interval for the floodlight is about 2 minutes.
- C: Only under the "Full Color" mode and "Smart" mode will the floodlight turn on at night.
How to add a new camera to the YESKAMO NVR system?
The cameras are paired with the NVR system before they are packed, and they will auto-pair with the NVR after you plug the whole camera system into the power socket. But if a camera loses connection with the NVR recorder accidentally, or you want to add a new camera to this kit, please pair / match-code the camera with the NVR as in the steps below:
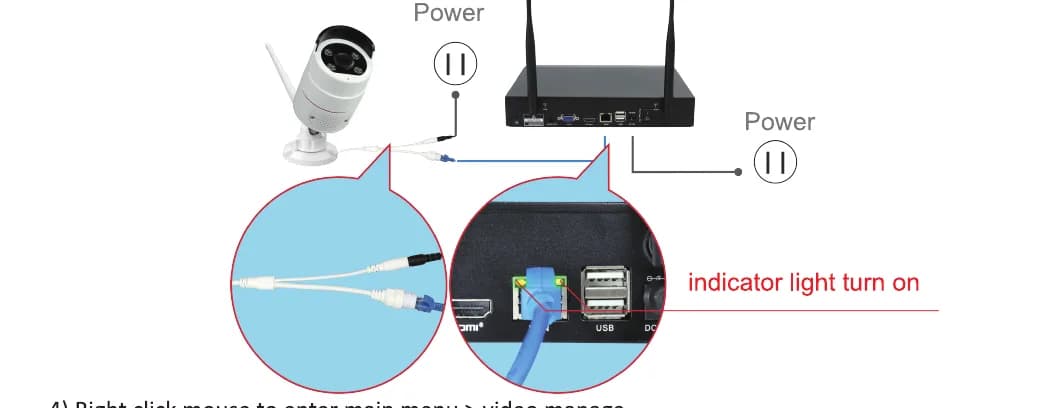
Take the camera near the NVR recorder.
Plug the camera into a power outlet via the provided 12V 1A power adapter.
Use an Ethernet cable (RJ45) to connect the camera with the NVR recorder; the WAN indicator light at the back panel of the NVR will turn on.
Right-click the mouse to enter Main Menu > Video Manage. The upper box shows information about the camera, and the lower box shows the channel information of the NVR.
If the channel status in the lower box shows "IPC disconnect", "connect fail" or "different segment"…, select that channel with the mouse, then click "delete", and the status of that channel will be "No video source".
Click "Search" in the upper box; the new IP address will pop up in a minute, then click "match code".
The camera will be connecting with the NVR, and the "WiFi add" interface will pop up.
Click "Exit" until the camera's IP address pops up for that channel. (The IP address will be 172.20.14.xx.)
The picture of the camera will be shown on the monitor, and the status of that channel will be "connect success" on the video manage interface.
Then you can disconnect the Ethernet cable and install the camera anywhere you want. (The camera should be installed within the NVR's WiFi range. Connect the Ethernet cable back to the router with NVR if you need remote view.)
Note
This is a quick user guide; please refer to the full user manual for further information.
Technical support
YESKAMO Technology Co. Ltd — Website: www.yeskamo.com
| ✉️ United States | [email protected] |
| ✉️ United Kingdom | [email protected] |
| 📞 United States | +1 830 745 5888 |
| 📞 United Kingdom | +44 20 3807 4763 |
Although we make every effort to keep this manual complete and accurate, there may be discrepancies as the product is updated over time. Please contact us directly for the latest user manual if you need it.