 YESKAMO App 文件
BC13 Smart Battery Power IP Camera — User Manual
Full user manual for the YESKAMO BC13 smart battery-powered Wi-Fi IP camera — product details, app pairing, installation, sharing, advanced features, NVR pairing, and troubleshooting.
The YESKAMO BC13 Smart Battery Power IP Camera is a wire-free, rechargeable Wi-Fi camera with a built-in PIR sensor. It can work as a standalone battery camera through the phone app, or be paired to a YESKAMO Wi-Fi NVR system.
Before you start
The BC13 works with the EseeCloud / YESKAMO app. If you have not installed it yet, see Download the YESKAMO app and YESKAMO app vs EseeCloud.
I. Statement
- Even though we made great efforts to make this manual accurate and comprehensive, there might still be some discrepancies due to the product's timely update.
- The products and manual are subject to change without previous notification.
- The content in this manual is only for reference. There is no guarantee that the accessories or app are exactly the same as the one you received. Detailed information is in accordance with the final products.
- If you encounter any challenges or issues while operating the camera, please do not hesitate to contact us for assistance. We will do everything in our power to improve our response time so we can provide you with speedy customer service.
Contact us
Website: www.yeskamo.com
| ✉️ United States | [email protected] |
| ✉️ United Kingdom | [email protected] |
| 📞 United States | +1 830 745 5888 |
| 📞 United Kingdom | +44 20 3807 4763 |
II. Safety Caution
- Please read the manual carefully and operate in accordance with the instructions.
- Please do not transform or modify the product, do not open the case or disassemble the product.
- Please use the product under its standard working temperature and humidity. Extra-high temperature and humid conditions will reduce battery performance and lead to the camera dropping offline.
- If you don't use the camera for a long time (a week or more), take off the camera and store it indoors. If the moisture inside does not evaporate due to the temperature and humidity of the environment, it will affect the periphery of the main board and cause rust.
- Avoid mud, sand, water, drops, bumps, etc. Also avoid setting up the device in such an environment, as it can lead to failures or damage.
- Do not use this product under conditions of fire, earthquake, lightning, wind and flood damage, or other disasters and external factors (such as pollution or voltage disturbances) that could cause malfunction or damage.
- We assume no responsibility for malfunctions or damage due to bracket failures (storage in hot and humid places, battery leakage, etc.) or improper protection.
- The camera is IP65 weatherproof. It is better to install the battery camera in a shaded area (such as under eaves) to prevent any possibility of accelerated wear and tear of the element. Please note the IP65 rating won't allow the camera to soak in water or stay under heavy rain for a long time.
- Please turn off the device before inserting a Micro SD card. Please make sure the camera is set up and works properly before installation.
III. Product Details
1. Camera Structure
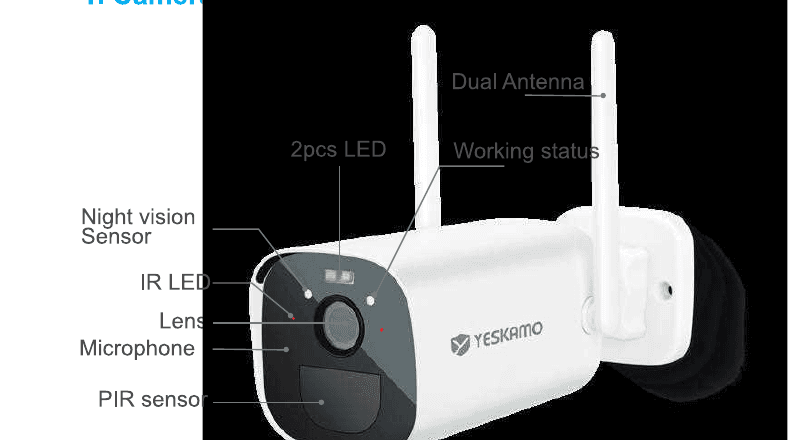
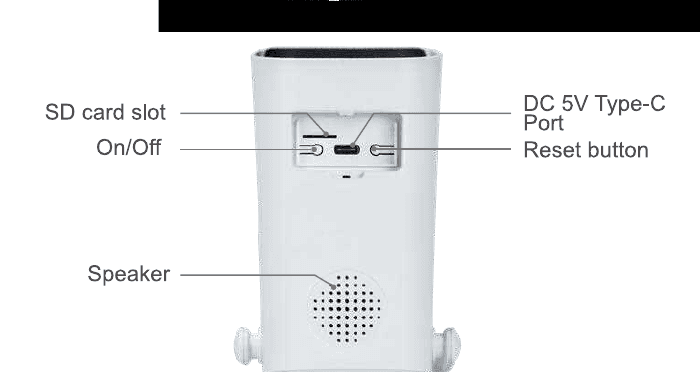
2. Camera Button and Indicator
| No. | Camera Button | Operation |
|---|---|---|
| 1 | Power button | Press and hold the button for 5 seconds to turn the device on / off. |
| 2 | Reset button | Press and hold the button for 5–8 seconds to reset the device. |
| No. | Front Indicator | Camera Status |
|---|---|---|
| 1 | Green light + red light always on | The camera is being previewed remotely (privacy light) |
| 2 | Green light on for 1s | The camera is turned on or is woken up |
| 3 | Green light flashes continuously | Upgrading |
| 4 | Green light always on | Charging |
| 5 | Red light flashes 3 times | Power off |
| 6 | Red light flashes continuously fast | Matching code (pairing) |
| 7 | Red light flashes continuously slowly | Connecting to the internet |
| 8 | Red light always on | Low battery |
| 9 | No indicator | Sleep status or power off |
3. Specifications
Camera
| Item | Value |
|---|---|
| Image sensor | 3MP Color Sensor 1/3.2" CMOS |
| Audio input / output | Built-in microphone and speaker |
| Lens | 2.8mm |
| Angle of view | 120 degrees |
| Day & night | Electronic (IR-CUT filter with auto switch) |
Compression Standard
| Item | Value |
|---|---|
| Video compression | H.264 / H.265 |
| Dual stream | Yes |
Image
| Item | Value |
|---|---|
| Image resolution | 2304×1296 pixel |
| Frame rate | 15fps |
Network
| Item | Value |
|---|---|
| Alarm trigger | PIR intelligent motion detection |
| Wireless security | WEP, WPA, WPA2 |
| Remote wakeup | Support |
| Wireless | 2.4G Wi-Fi (IEEE 802.11b / g / n), 5G not supported |
| Security | User authentication, software encryption |
Battery
| Item | Value |
|---|---|
| Battery | 10400mAh rechargeable |
| Standby consumption | 500μA |
| Work consumption | 300mA |
| Standby time | 10 months |
| Working time | 4 months (assuming 3 mins wake up per day) |
General
| Item | Value |
|---|---|
| Operating temperature | −20 °C to 50 °C |
| Power supply | Type-C DC 5V 2A |
IV. Working Network Diagram
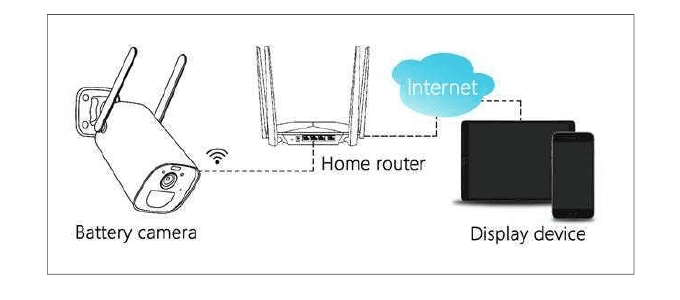
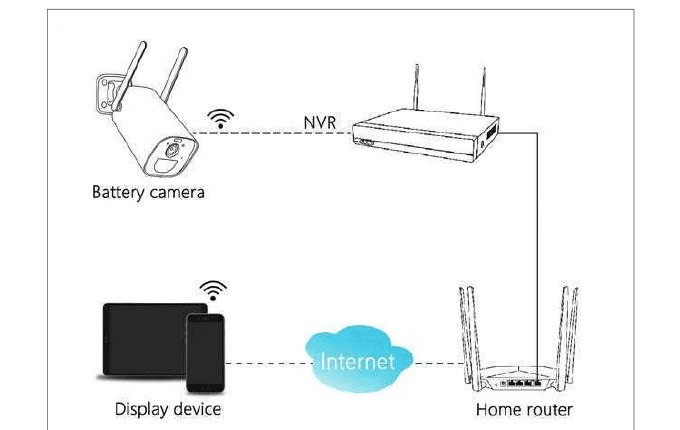
The battery camera supports 2 connecting modes.
1. Remote view by connecting the router
2. Pair to a wireless NVR
V. Configuration on Phone App (Work as Standalone Battery Camera)
1. Download the EseeCloud / YESKAMO app
Search for the EseeCloud or YESKAMO app in the App Store / Google Play, or scan the QR code on the package to download and install it.
Compatible with iOS 9.0 and above, and Android 4.0 and above.
When you run the app for the first time, please approve the following two permissions:
Enable 4G or WLAN on the phone. Allow "Wireless Data" to use WLAN & Cellular Data.
Enable notifications. Go to phone Settings → Notification → EseeCloud and enable "Allow notifications".
2. Create an account and login
Sign up with your phone number (email address registration is not allowed for this camera's app flow).
Tap Sign Up on the interface. Enable "Registration means agreement with the user agreement and privacy policy", then tap Confirm.
A verification code will be sent via text. Input the verified code, set a username and password, and tap Confirm. If you don't receive any code, check your message spam.
Log in to the app with the account you created.
3. Add device to phone app
3.1 Power on and reset the camera
Power the camera. Uncover the rubber seal cover on the camera bottom, press and hold the power (ON / OFF) button for 3 seconds to turn it on, and release when you hear the startup music. Check the front indicator — it should be blinking red, which means it is ready for network configuration.
If it doesn't turn on, charge it with a DC 5V 2A power adapter for 15 minutes to wake it up.
A DC 5V 2A power adapter is not included in the package. Please use your phone charger.

Take the camera and smartphone close to the router (30 to 100 cm) and connect the phone to the router's Wi-Fi. Supports 2.4GHz Wi-Fi only.
Reset the camera. Press and hold the reset button for about 5–8 seconds, release after you hear the prompt voice "Resetting Success", and after about 5 seconds it says "Starting Pairing".
3.2 Wi-Fi wireless connection
Add device on app. Run the EseeCloud app, tap "+" in the middle or in the right corner, and scan the QR code on the camera body (or choose Other ways to Add → Battery Camera).
Make sure the red light is blinking fast, then tap Add → "Device light is blinking" → Remote View.
Wi-Fi setup. Input your Wi-Fi password, double-check that it's correct, then tap Next (works with 2.4G Wi-Fi only). For more help, see Connect your camera to Wi-Fi.
At the Device Scan QR Code interface, put the QR code in front of the camera lens about 15 cm (5.9 inches). It will make a sound, "Scanning the QR code successfully". Then tap "Hear the prompt voice / indicator does not flash" on the phone.

The camera is connecting to the network. Wait for the bar to update to 100% to finish the connection, then touch Add the device to list to complete the initial setting.
Note
- After configuration is finished, the camera is in standby status when not watching video or no motion is detected, and the front indicator is off.
- If you need to switch the Wi-Fi network, you must reset the camera and re-setup. If you reset the camera, the camera will disconnect from this network.
- This camera supports setup on one phone only. To share the device on a default mobile phone to others, refer to VII. Share the Camera with Family.
4. Device Setup
Tap "..." in the upper right corner → Setup → customize your device.
4.1 Smart motion detection / recording
| Option | Function |
|---|---|
| Humanoid detection alarm | When a humanoid is detected, an alarm message is generated. Messages help tell whether the movement is caused by a human or other objects. |
| Detection sensitivity | Adjust the sensitivity of humanoid detection: Highest / High / Medium / Low / Lowest. |
| Recording | Smart detection recording duration: 10sec / 20sec / 30sec. |
4.2 Power management
| Option | Function |
|---|---|
| Power-saving mode | When the device detects a moving object, it wakes up and records. Recording duration 10S / 20S / 30S only works under this mode, then the device enters the sleep state. |
| Best video | Keeps recording while continuously detecting moving objects. |
| Constant power mode | The device is always in the recording state. |
4.3 Privacy zone settings
Cover the privacy zone based on your needs. On the Setup interface, scroll down the screen → Advanced settings → Privacy zone settings.
VI. Installation
1. Surveillance Area
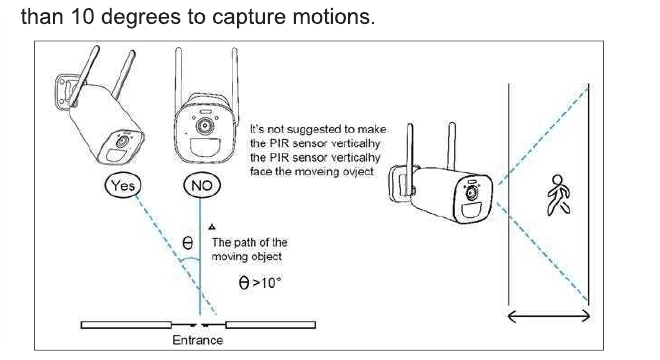
When installing the camera, the PIR sensor should not be vertically aligned with the moving objects, as it may not be sensitive to movement. It is recommended that the camera be tilted more than 10 degrees to capture motions.
2. Installation
- Fully charge the camera before installation. It takes about 8 hours to fully charge with a 5V 2A charger (not included).
- Connect the camera to the phone app or wireless NVR, and make sure the camera is working well before installing.
- Install the Micro SD card. Turn off the battery camera, insert the Micro SD card correctly, then turn on the camera (refer to Storage and Playback for more about the SD card).
- Use an electric drill to drill holes in the wall, and fix the bracket base with screws.

3. Take Down & Recharging
- Rotate the wing-shape fixture counterclockwise to remove the camera when necessary.
- Fully charge the battery camera.
- Rotate the wing-shape fixture clockwise to fix the camera.

4. Tips to Reduce False Alarms
- Do not install the camera in a place directly facing bright objects or light sources, including sunshine, bright lamp lights, etc.
- Please do not install the camera in a place where vehicles and personnel frequently go in and out.
- A large amount of data shows that the camera can detect people and vehicles within a distance of 15 meters (55 feet).
- Keep the camera away from outlets such as air conditioning vents, humidifiers, heat transfer openings of projectors, etc.
- Do not leave the camera facing a mirror.
- Keep the camera at least 1 meter away from wireless devices to avoid wireless interference.
- Please make sure there are no obstacles within 3 meters in front of the lens, otherwise in the night vision picture the close objects will be overexposed and the further objects will be very dark.
VII. Share the Camera with Family
1. Sign up a new account
Download the EseeCloud app on the family member's phone, then sign up and login with a new account (follow the instructions in V. Configuration on Phone App → 2. Create account and login).
2. Device share
Click Share in your account, and customize "Share Permissions" and "QR code validity period". Hit the "✓" in the upper right corner, and the sharing code comes out. On the family member's phone, tap "+" in the right corner and scan the code on your phone.
3. Sharing permissions
- By default, the shared family member's phone only has view privileges. You can adjust settings on your phone to share privileges such as: video view / video playback / alarm push / setup.
- You can set the QR code validity period to be "Always effective" or "Custom time" (5 minutes).
4. Delete share
Tap "Me" on the bottom page → Share list → Edit → Choose → Delete.
VIII. More Features About Battery Camera
1. Motion Detection
The battery camera with PIR sensor is not designed for 7×24 hours recording. It realizes the security purpose by pushing alarm notifications to the phone and recording video when motion events are detected. You can replay recordings anytime via the EseeCloud app.
1.1 The PIR sensor detecting sensitivity is adjustable with Low to High options. Default is High. Tap the "..." in the upper right corner → Setup → Smart detection → Motion detection sensitivity → Highest / High / Medium / Low / Lowest.
1.2 Receive notifications. Enable "Receive Notifications" to get a notification alarm when motion is triggered. It defaults to enabled. Tap "..." in the right corner → Setup → Smart detection → Alarm settings → enable "Push notification". Tap the video frame on the News screen to see all alarm messages. See also Motion alerts & notifications.
2. Storage and Playback
- Motion recordings save to the Micro SD card or Cloud service (need subscription fee). The Micro SD card is not included in the package.
- The Micro SD card supports up to 128 GB. To ensure the recognition rate and Micro SD card quality, we recommend a Class 10 speed Micro SD card.
- Please format the Micro SD card before inserting it into the camera. It supports FAT32 or EXFAT32 format only.
- Please insert the Micro SD card when the camera is powered off. It shows the storage capacity in the EseeCloud app when the Micro SD card is recognized.
- Check the Micro SD card capacity: tap "..." in the upper right corner → Setup → Device storage → TF card storage → Remaining available capacity.
3. Battery Management
3.1 Battery management. The camera has a built-in 10400mAh lithium battery, with a theoretical battery life of 6 months assuming the camera wakes up 3 minutes per day.
3.2 Power adapter recharge. You can charge the camera with a DC 5V 2A adapter (not included in the package). The charge indicator stays red while charging and turns green when 100% fully charged.
3.3 Solar panel recharge. The battery camera supports charging with the YESKAMO solar panel with a Type-C connector. Please do not use other solar panels to charge it. Solar panel charging isn't as efficient as electricity, but can still meet most daily security needs. Please make sure the solar panel is well connected and gets direct strong sunlight.
4. Two-Way Talk and Volume
4.1 Two-way talk. Hit the Sound button on the live view screen — you can Mute / turn On sound. Press the Call button to talk to the camera scene; with your phone sound on, you can hear back.
4.2 Volume control. Tap "..." in the upper right corner of the Device screen → Setup → Device volume → touch to adjust. Default volume is 80.
5. Color Mode Adjust
Tap into live video → Light control → Infrared / Full color.
- Infrared: the spotlight never turns on.
- Full color: the spotlight will turn on automatically when it detects motion in darkness.
IX. Work With Wi-Fi NVR System (Add to YESKAMO Wi-Fi Security Systems)
The battery camera only supports being added to a YESKAMO Wi-Fi NVR base; the compatible version must be 3.1.6.0 or above. The default recording mode is motion detection recording, and the battery camera doesn't support continuous 7×24 recording. Motion video will be saved on the hard drive. The battery camera doesn't support light mode adjustment; it defaults to smart mode.
How to add the battery camera to a YESKAMO wireless NVR?
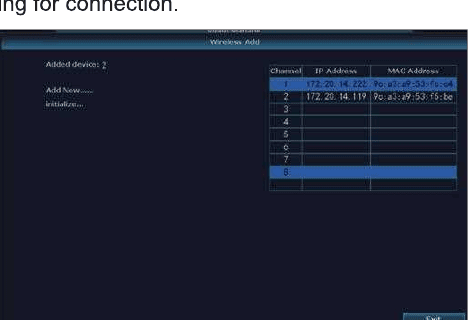
For more help, see Add a camera to your NVR kit.
X. EseeCloud App Menu
| Icon | Function |
|---|---|
| Playback | Hit to playback recording |
| Screen Switch button | Tap into full screen |
| Definition Switch button | Customize the preview video definition between HD (high definition) & SD (standard definition) |
| Light control | Infrared: spotlight never turns on. Full color: spotlight turns on automatically when it detects motion in darkness (battery camera's spotlight never turns on when added to a wireless NVR system) |
| Call | Tap into two-way audio |
| Screenshot | Screen shot |
| Sound | Mute the video sound |
| Recording | Record the real-time video |
| Time bar | Drag the timeline to modify the playback time |
| Setup | Device's information and settings |
XI. Troubleshooting Table
| No. | Issue | Solution and operation |
|---|---|---|
| 1 | Connection can not be established | 1) Check your Wi-Fi name and password. 2) Make sure your Wi-Fi is 2.4G — it does not support 5G. 3) Make sure your camera and mobile phone, router are close enough. 4) Email the customer service staff to solve your problem within 24 hours. |
| 2 | Reset to default | 1) Press and hold the reset button for 5–8 seconds. 2) Hear "resetting success". 3) The green light turns on. |
| 3 | How to connect the camera to a new Wi-Fi network | 1) Press the reset button to the factory setting. 2) Remove the camera in the EseeCloud app. 3) Re-connection. |
| 4 | Alarm picture without persons | 1) The camera needs time to wake up and people are moving too fast. 2) Some objects with overheat may be detected by PIR; it is recommended to lower the sensitivity of the PIR alarm. |
| 5 | Frequent alarm | 1) The environment or the number of vehicles where you install the camera triggers the cameras frequently. It is recommended to change the installation angle. 2) Adjust the camera alarm sensitivity to "low". |
| 6 | Why is someone crossing without alarm? | The PIR inspection area has a range limitation. It may be that the person passing the position is too far or too close, or the person passes quickly from a corner of the camera and is not successfully detected by the PIR. |
| 7 | No alarm push | 1) Make sure the app has notification permissions. 2) Confirm the alarm message push switch is turned on in the App personal center. 3) Confirm the alarm message push switch is allowed in the device's settings. |
| 8 | No alarm video recording | Please insert the Micro SD card, or subscribe to cloud storage. |
| 9 | Device offline | 1) Check if the network works well. 2) Check the connection between the camera and router. If you changed the router or Wi-Fi password, you need to reset the camera and reconfigure the network. 3) Check if the camera battery is running out — you can plug in the power and try again. See also Camera offline / not working. |
| 10 | Video delay | Check the Wi-Fi network — the distance between the camera and the router should not be too long. |
| 11 | Short battery life | The camera was awakened too often, and should not be placed on the roadside or in the sun. |
| 12 | Unable to charge | 1) Please use the 5V 2A Type-C power adapter to charge the camera correctly. 2) When the charging is normal, the charging indicator will light red. If the charging indicator does not light, the charging is not successful. Please check if the power adapter and charging cable are normal. |
| 13 | Battery runs out quickly | The app counts the daily recording time when you playback video. Please check if there are more videos every day. If there are many false triggers, please try to lower the trigger sensitivity setting. Check the Wi-Fi signal between the camera and the router; if it is weak, you could adjust the position of the router or camera to improve the signal transmission. |

Made in China
YESKAMO warranty registration & privacy
Register your YESKAMO warranty and understand where footage is stored, App Store privacy disclosures, and the official privacy policy.
PTZ Floodlight IP Camera — User Manual
Full user manual for the YESKAMO PTZ Floodlight IP Camera — product structure, app configuration, pan/tilt control, device settings, sharing, and FAQ.