 YESKAMO App 文件
PTZ Floodlight IP Camera — User Manual
Full user manual for the YESKAMO PTZ Floodlight IP Camera — product structure, app configuration, pan/tilt control, device settings, sharing, and FAQ.
The YESKAMO PTZ Floodlight IP Camera is a pan-and-tilt Wi-Fi camera with a built-in motion sensor and floodlights. It rotates horizontally and vertically so you can cover a wider area, and it can be used as a standalone Wi-Fi camera or added to a YESKAMO NVR system.
App needed
This camera works with the EseeCloud app. See also Download the YESKAMO app.
I. Statement
Thank you for purchasing the YESKAMO Security Wi-Fi Camera with floodlight. The motion and humanoid alarm camera has floodlights — when the camera catches any suspicious activity in its detection area, or detects human movement, you will get an alert message through the phone and a siren alarm from the camera side. At night, the floodlight will also automatically switch on when any suspicious activity is detected, and color vision will then be enabled to film any unexpected movement. The built-in microphone and speaker let you hear and speak to the people on your property.
| YESKAMO | |
|---|---|
| Website | www.yeskamo.com |
| [email protected] (for US) / [email protected] (for UK) | |
| Tel | +1 830 745 5888 (US) / +44 20 3807 4763 (UK) |
II. Product Structure
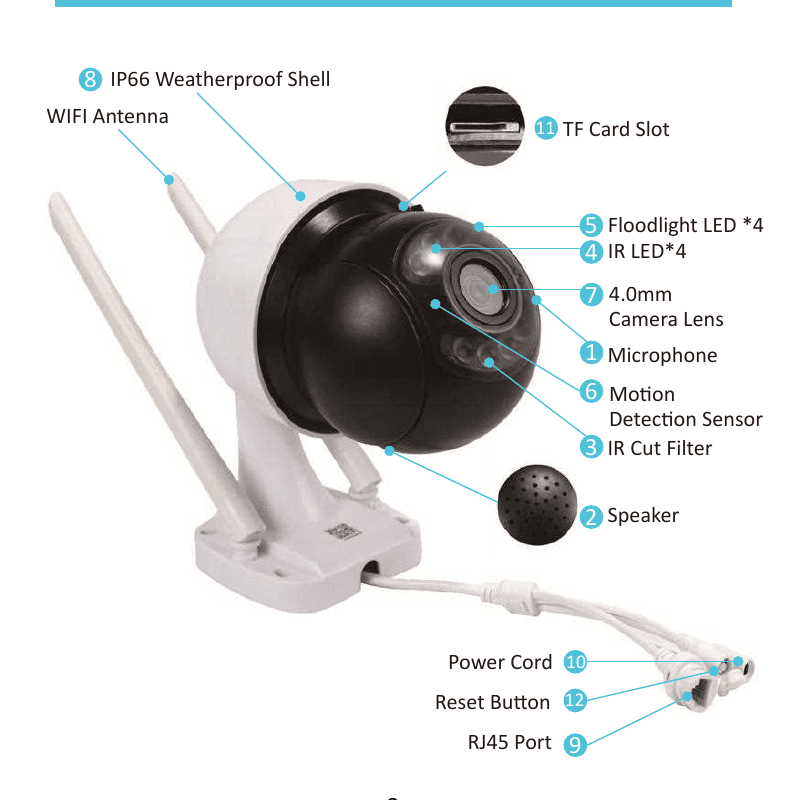
- Microphone: Pick up audio.
- Speaker: Transmit sound.
- IR Cut Filter: Auto switch day/night mode.
- IR LED ×4: IR LEDs will automatically switch on in darkness for night vision.
- Floodlight ×4: Will turn on automatically in the darkness when the motion detection sensor is triggered.
- Motion Detection sensor: Detect objects in its view field.
- 4.0mm Lens: Provides a wide viewing angle up to 79°.
- Weatherproof IP66 Housing: Working temperature −20°C/−4°F to 60°C/140°F.
- RJ-45 Ethernet port: A) Add the camera to a YESKAMO NVR recorder as a standard NVR kit if you want. B) Wired-connect the camera to the internet if you failed to configure it for a wireless connection.
- Power-in Port: Connect with the provided 12V 1A plug for power supply.
- TF Card slot: Insert a TF card for video storage (max support 128G TF card, TF card must be FAT32 format).
- Reset button: Press and hold the reset button about 5–10 seconds to restore the camera to factory setting.
- Horizontal rotation range: 0°~355°, 0.1°~20°/s.
- Vertical rotation range: 0°~90°, 0.1°~20°/s.
III. About the Floodlight Camera
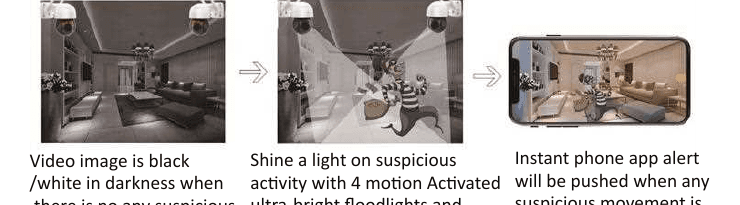
This alarm camera has a built-in motion sensor and floodlights. When the camera catches any suspicious activity in its detection area, you will get an alert through the phone or camera. A shine light on suspicious activity with a 4-motion-activated ultra-bright floodlight and record colored video for the unexpected activity at night. Video image is black/white when there is no movement in the darkness.
- The camera works with or without an NVR recorder. The alarm camera can be used as a standalone Wi-Fi camera, which you can view directly on the phone app; or you can add the floodlight camera to a YESKAMO NVR recorder as a standard NVR camera kit.
- The camera has a built-in motion sensor — you will get an instant phone app alert and/or siren alarm when any suspicious activity or humanoid movement is detected.
- The camera has built-in IR LEDs and floodlight LEDs. The IR LED will automatically switch on when ambient light is insufficient and will create clear black/white videos. The floodlight will come on automatically (in the darkness) ONLY when any suspicious activity is caught on camera and will then allow color video recording for the unexpected activity. (The floodlight will NOT turn on at day time.)
IV. Configuration on Phone App
1. Power on camera
Connect the camera with the supplied 12V 1A adapter, then plug the adapter into a nearby power socket.
2. Download App
Search the app "EseeCloud" in the App Store or Google Play. If you can't find it, scan the QR code on the package (please keep updating the phone app version).
Supports Android 9.0 or higher version, and iOS 5.0 or higher version.
3. Create an account and login
Register an account with your email address / phone number and password. A verification code will be sent via text. Tap Register, enter your email/phone number, agree to the software agreement, and tap Confirm.
4. Add device
First, reset the camera: press and hold the reset button of the camera about 5–10 seconds until you hear a voice prompt, and the camera will restart automatically.
Go to Setup → Wifi on your phone.
Connect your phone to the camera's hotspot named "IPC…" and input the default hotspot password "11111111".
Enter APP → My Device → tap "+" Icon.
Click "other ways to add".
Tap the "Standalone camera" button.
You could watch the camera video right now. Please choose Remote View or Direct Connection.
- Please input your router name and password (make sure you input the correct password of home Wi-Fi), then click the "confirm" button. (Tip: 5GHz wireless network is not supported at this time.)
- The device will start to connect — please wait for the camera connecting to the internet with the voice prompt "wireless setting, please wait". (The network configuration process may take 1–2 minutes, please be patient. Do not unplug the network!)
- Get the voice prompt "the wireless connection is successful", then click "continue" to finish the configuration.
Set the device name, then click confirm. The camera will be added successfully. (For added security, please set a password — or tap "Skip".)
5. Preview and playback
| Button | Function |
|---|---|
| Playback/live Video Switch Button | Switching between playback video & real-time live video |
| Window Switch Button | Customize the screen to show how many windows at one time |
| Proportion | Adjust video proportion. Customize the preview video proportion. |
| Definition Switch Button | Customize the preview video definition between HD (high definition) & SD (standard definition) |
| Microphone Button | Suitable for devices with microphone. Hold the button to talk to the camera. |
| PTZ | Control the camera to rotate up and down, left and right. |
| Screenshot Button | Screen shot |
| Speaker On/Off Button | Whether to play the sound captured by camera device |
| Recording Button | Recording the real-time video |
| Real Time | Back to real-time video recording |
| Playback Channel | Select the channel to playback |
| Calendar Button | Selecting playback date |
| Time Bar | Drag the timeline to modify the playback time |
| Backup Button | Backup and download the recorded video to phone |
6. Device Settings
6.1 Motion Detection Recording
Hit the "Settings" icon on the bottom right corner of the device screen → General settings → Motion Detection Recording → Humanoid Settings / Recording and detection settings / Alarm and Prompt tone settings.
1) Humanoid settings
| Option | Function |
|---|---|
| Humanoid detection alarm | When a humanoid is detected, an alarm message is generated. Messages help tell whether the movement is caused by a human or other objects. |
| Humanoid detection sensitivity | Enable the above (Humanoid detection alarm) and this option shows up. Adjust the sensitivity of humanoid detection. |
| Humanoid picture frame | Enable to mark a red square on human motion. |
2) Recording and detection settings
| Option | Function |
|---|---|
| Motion detect area | Select the area you want to focus on. The warning line helps alert when movements pass the line. |
| Motion recording | Automatic video recording when a moving object is detected. |
| Humanoid tracking | Enabled, and when a human is detected it will automatically track the movement. |
3) Alarm and Prompt tone settings
| Option | Function |
|---|---|
| Enable motion detection notifications | Enabled to receive motion alarm notifications. |
| Alarm time setting | Setup the time schedule to receive alarm notifications. |
| Motion detection sensitivity | Adjust the motion detection sensitivity. |
| Enable motion detection alarm siren | Enable default siren alarm when movement detected, or customize your own alarm tone (scrolling screen to find the option). |
6.2 Advanced settings
Hit the "Settings" icon on the bottom right corner of the device screen → on the "Setup" interface scrolling down screen → Advanced settings.
1) Video screen reversal
Advanced settings → Video screen reversal. Setup up & down reversal or left & right reversal to get the correct screen based on different installation.
2) Video quality setting
The PTZ camera supports setting up the floodlight and IR-night vision mode; it includes Infrared / full color / intelligent modes. Advanced settings → Video quality settings → Infrared / Full color / Intelligent.
| Option | Function |
|---|---|
| Infrared | Choose Infrared mode — the camera displays only black & white picture at night, the floodlight never comes on. |
| Full color | Full color mode — the spotlight remains on all night. If you want your camera to record full-color videos day and night, this is the right setting. |
| Intelligent | Smart mode means when there's no motion, the camera uses IR LEDs and video is black and white. However, as soon as it detects motion, the floodlight turns on at night and the camera switches to full-color videos for about 15 seconds. |
3) Privacy zone settings
Cover the privacy zone based on needs. But due to the PTZ feature of this camera, this function isn't suitable for application. On the "Setup" interface scrolling down screen → Advanced settings → Privacy zone settings.
6.3 More Settings
1) Device Wi-Fi. On the "Setup" interface scrolling down screen → General settings → Device's WiFi. Change Wi-Fi for the camera if your home Wi-Fi changed or the Wi-Fi password is reset. Please notice it only works wirelessly with 2.4GHz Wi-Fi.
2) Device Storage. Setup → Device Storage → Cloud storage / TF card storage. The camera supports subscribing to Cloud storage and MicroSD card storage. MicroSD card supports up to 128GB and FAT32 format. Please format the SD card on a computer into FAT32 format and make sure the camera is off when you insert the card. You can check the card capacity if it has been installed correctly and recognized.
3) Setup Password. On the "Setup" interface scrolling down screen → Setup Password → User name / Password. Setup or reset a password for the camera so it is more secure, and then others need a password to be shared.
6.4 Share the Device
You can easily share the device with your families after you finish the configuration of the camera on the phone app. Hit the Share icon → Device share permissions → hit the tick on the upper right corner to get the QR code → Scanning QR code with family → Confirm Add on the shared phone → Success.
Note
The valid time for the QR code is only 300 seconds. Please create the QR code again if it is invalid. You can setup permissions for each shared device.
There are other 2 ways to share the device with families:
- Manually add the device via cloud ID. On the family's phone, enter APP → Device → click "+" Icon → choose "Other ways to add" → Hit "Add by ID/IP" → Input Cloud ID and password → Hit "Complete" and done. (Cloud ID: A) Check it on the primary phone which configured the camera. B) Check the label on the camera body.)
- LAN scan add the device. The phone and camera must be within the same Wi-Fi environment if you choose "LAN scan". On the family's phone, enter APP → Device → click "+" Icon → choose "Other ways to add" → Hit "LAN Scan" → Hit "Add" → Input password → Hit "Complete" and done.
V. FAQ
Q1. How to insert a TF Card for the camera?
- Unplug the camera from the power source.
- Remove the rubber plug for the TF card port from the camera.
- Insert the TF card slightly.
- Cover the TF card rubber plug back on the camera seamlessly.
- Power on the camera and format the TF card (about SD card format, please refer to "6.3 More settings → 2) Device storage").
Q2. How to turn off the phone app notification?
There are two methods to turn off app notifications:
- A. On the phone app → Me → Settings → disable "Push notification".
- B. Hit "Settings" on the Device screen → Motion detection recording → Disable "Enable motion detection notifications".
Q3. How to turn on and turn off the siren alarm from the camera side?
Hit "Settings" on the Device screen → Motion detection recording → Enable/Disable "Enable motion detection alarm siren".
Q4. Why can I not get a phone app notification alert?
- A. Please check whether you disable "Push notification".
- B. Please check whether you disable "Push notification". On the phone app → Me → Settings → disable "Push notification".
- C. Please check whether you disable "Enable motion detection notifications". Hit "Settings" on the Device screen → Motion detection recording → Disable "Enable motion detection notifications".
- Please check whether you allow notifications for EseeCloud App on your phone setting. On the phone settings → Notifications → find "EseeCloud" → allow notifications.
Q5. Why can I not playback the video?
- A. Please check whether you enable the Motion recording. Device settings → Motion detection recording → Enable "Motion detection" → Enable "Motion recording".
- B. Check if you have setup full time recording for camera. Device settings → Time recording management.
- C. Please check whether the TF card is under a normal status — it needs to be equipped with storage capacity to playback. Device settings → Device storage → TF card storage.
Q6. How to view the motion detection alert's recording?
On the App main screen → Hit "News" below the picture frame → Hit the alert message on the alert list → view the motion detection recording about a certain movement.
Q7. Why can I not hear the sound from the camera?
- A. Please check whether you turn on the "speaker" button on the phone app.
- B. Please check the volume setting of your phone — there will be no voice if the phone's volume is too low.
Q8. Why doesn't the floodlight turn on when someone passes by?
- A. The floodlight only turns on at night (IR night vision activated) when the camera detects people; it will not turn on at day time.
- B. The time interval for the floodlight is about 2 minutes.
- C. If someone is beyond the detection range, it will not trigger alarms. So please kindly check the installation height and angle for the alarm camera.
- D. Please check whether you choose "infrared" mode for the camera. (Refer to "6.2 Advanced settings → 2) Video quality settings".)
Q9. Why does my camera show "offline" on the phone app?
- A. Please check whether the camera has a power supply. (Cover the IR-cut filter of the camera and the IR led will turn on in the darkness.)
- B. Please check whether the camera is installed within your router's Wi-Fi range.
- C. Maybe the camera is restored to the factory setting — please configure it again.
Q10. Where can I change the password for the camera?
The default username for the camera is "admin", and the default password is no password (leave it empty is ok). If you want to reset the password of the camera:
- A. Setup the password when you configure the camera on the phone app at first time.
- B. On the Device settings page → Setup Password → Password → input the original password, new password and confirm password → Hit "Confirm" to complete.
Q11. What to do if you can NOT finish the configuration of the camera on the phone app?
If you click the "reset" button, but failed to configure the camera on the phone app, please follow the steps below:
-
Connect the RJ45 port of the camera to the LAN port of the router with an Ethernet cable; the camera will connect with the internet in minutes.
-
Add the device cloud ID on the phone app.
- Scan to add the device cloud ID: Enter APP → Device → tap "+" Icon → choose "scan" → scan the QR code label on the camera body → click "complete" and the camera is added on the phone app successfully.
- Manually add the device cloud ID: Enter APP → Device → click "+" Icon → add → Networked device (or DVR/NVR) → input device cloud ID → click "complete" and the camera is added to the phone app successfully.
If the camera status doesn't go online, please check whether your router is 2.4GHz, and try to restart the router, then the camera will be online in minutes.
-
Set the wireless network for the camera. Click the "Settings" button at the button right corner → Device's Wi-Fi → input/select your home Wi-Fi name → input the password of your home Wi-Fi → click "Save" to finish the wireless network setting. The wireless network configuration is a success, then you can remove the Ethernet cable between the camera and router.
Note
- A) When you connect the camera to the LAN port of the router, the camera will access the internet and the network status of the camera will be ONLINE on the phone app.
- B) When you configure the wireless network for the camera, the camera and your phone should be at the same network (merely wired-connect the camera to the router with an Ethernet cable, and your phone connects the router's Wi-Fi network at the same time).
- C) The router should be 2.4GHz.
BC13 Smart Battery Power IP Camera — User Manual
Full user manual for the YESKAMO BC13 smart battery-powered Wi-Fi IP camera — product details, app pairing, installation, sharing, advanced features, NVR pairing, and troubleshooting.
Floodlight IP Camera — User Manual
Full user manual for the YESKAMO PIR Motion Activated Alarm Camera with Floodlight — product description, installation angle, app configuration, device setup, FAQ, and support.