 YESKAMO App 文件
Floodlight Camera System for YESKAMO POE Security Camera Kits — Full Manual
Full user manual for YESKAMO POE security camera kits with floodlight AI alarm cameras — NVR setup, phone app and computer (CMS) viewing, recording, alerts, maintenance, and FAQ.
This is the full user manual for YESKAMO POE Security Camera Kits that include AI alarm cameras with floodlight. It covers the NVR monitor system, remote viewing on the phone app and on a computer (CMS), recording, alerts, and system maintenance.
Related guides
For the phone app itself, see Download the YESKAMO app and Add a camera to your NVR kit.
Guide 1 — Camera & Installation
I. Statement
- Though we made great efforts to make the manual complete and accurate, there could still be some discrepancies due to the product's timely updates.
- The products and manual are subject to change without prior notice.
- The content in this manual is only for reference and is subject to the final product.
II. Safety Caution
- Please do not put any liquid container on the product.
- Please use the product in a ventilated environment and prevent blocking the vents.
- Please use the included power supply with the product to prevent damage to the product.
- Please use the product under its standard working temperature and humidity.
- All man-made damage and the following terms and condition are outside the scope of free
warranty:
- A) Accident, negligence, natural disaster.
- B) Inappropriate environment and condition, such as improper power supply, wrong working temperature, lightning stroke.
- C) Already beyond guarantee period.
III. Installation Angle for AI Alarm Camera
The detect angle for AI camera is about 90 degrees, and the detection distance is within 8 meters. The recommended installation height is not higher than 3m/10ft, and the recommended angle is transversely-mounted with the detection area. (Make the detection area a sector area like the picture shows.)
When people transversely cross the detection area, as the picture above, the camera will detect the movement sooner. When people go straight toward the camera, as the picture above, the PIR sensor will not be so sensitive.
An AI camera detects human movement. But sometimes it might be affected by airflow, such as rain or wind, which may cause some false alarms. So it is suggested to install the AI camera in a shaded area, such as eaves, to prevent accelerated wear and tear of the elements.
IV. About the AI Alarm Camera with Floodlight
The camera has a built-in AI chip — you will get an instant alert from the phone app or email when any suspicious activity is detected. Shine a light on suspicious activity with the AI- and PIR-activated floodlight, and record colored video for the unexpected activity. Video image is black/white when there is no movement in the darkness. (The floodlight will NOT turn on at day time.)
The camera has built-in IR LEDs and floodlight LEDs. The IR LED will automatically switch on when ambient light is insufficient and will create clear black/white videos. The floodlight will come on automatically (in the darkness) ONLY when any suspicious activity is detected and will then allow color video recording for the unexpected activity.
Guide 2 — Operating Your System
1. How to login the NVR Monitor system
The default user name is "admin", and the default password is no password (leave it blank). Click "Ok" to enter the NVR monitor system.
2. How to remotely view cameras on the phone app
1) Make sure the NVR monitor is ONLINE
Connect the WAN port of the NVR monitor to the LAN port of the router with an Ethernet cable, then the NVR monitor will be ONLINE. Right-click the mouse to enter main menu → Fast Network → Cloud (P2P) → ONLINE.
2) Download the free app
Search the free app "YESKAMO" or "EseeCloud" in the App Store or Google Play. The phone app will be updated sometimes; if your phone app menu is different from the menu in this user manual, please contact us to get the latest user manual.
3) Create an account and login
Register an account with your email address / phone number and password. A verification code will be sent via text.
4) Add the Cloud ID
Scan QR code to add the device ID: Enter APP → click "+" at the right top corner of the phone → "Scan code to add device".
Enter APP → click "+" in the right top corner or center of the phone → "Other ways to add" → input "Device Cloud ID" (the default password is no password) → click "Add" and "Complete" to finish.
- A) Right-click the mouse to enter main menu → System setup → Network setup → Network setup → scan QR code to add Cloud ID.
- B) Right-click the mouse to enter main menu → Fast network → Cloud ID → scan QR code to add Cloud ID.
5) Remotely view the cameras anytime
After you add the device cloud ID successfully, please double-click the device cloud ID to open all channels, or double-click each channel one by one to get the videos.
6) Icon function on the phone app
| Button | Function |
|---|---|
| Playback/live Video Switch Button | Switching between playback video & real-time live video |
| Window Switch Button | Customize the screen to show how many windows at one time |
| Proportion | Adjust video proportion. Customize the preview video proportion. |
| Definition Switch Button | Customize the preview video definition between HD (high definition) & SD (standard definition) |
| Microphone Button | Suitable for devices with microphone. Hold the button to talk to camera side support PTT |
| PTZ | Screen shot (for PTZ cameras, control PTZ) |
| Speaker On/Off Button | Whether to play the sound captured by camera device |
| Real Time | Back to real-time video recording |
| Playback Channel | Select the channel to playback |
| Calendar Button | Selecting playback date |
| Time Bar | Drag the timeline to modify the playback time |
| Backup Button | Backup and download the recorded video to phone |
7) Share device function
Click "share" — you can share the device with your friends or families.
Note
Please revise your password in the NVR system before sharing.
3. How to customize the recording mode
The default recording mode is 24/7 continuous recording, but you can change it to time scheduled recording or motion detection recording based on your requirement. The default motion detection recording mode is AI motion detection recording; the AI alarm camera can support both customized time record or motion record. Please follow the steps below:
Motion detection recording for AI alarm camera: Right-click the mouse to enter main menu → System Setup → Record Setup → Record plan → select "channel" → click "Time" or click "Motion" → customize schedule time with mouse → click "Apply" and "OK" to save the setting.
Note
"Time" means the NVR monitor will record continuously. "Motion" means the NVR monitor will only record when AI detects movement.
4. How to setup E-mail alert, App notification & camera siren alarm
There are 5 ways alert can be set when motion is detected: Buzzer, E-Mail Notice, APP Alarm, Split Screen, Drawn Region.
- Buzzer: NVR monitor will beep when motion is detected.
- E-mail Notice: you will receive an email alert.
- APP Alarm: you will get an alarm from the phone app when motion is detected.
- Split Screen: the motion-triggered channel video will switch to a full screen.
- Drawn Region: customize the motion detection area to a part of the channel screen.
1) Make sure the Wi-Fi monitor is ONLINE
Use Ethernet cable to connect the NVR monitor with the LAN port of the home router to get the NVR online.
2) Set up motion detection alert for the AI camera
Right-click the mouse to enter main menu → System Setup → Channel setup → Video detection → choose date, channel, record mode, time range, then click "search" to find the exact video.
3) Set up the email alert function
Right-click the mouse to enter main menu → System Setup → General Setup → E-mail Setup. If you want to set up the email alert for motion detection, the POP of this email should be enabled. Please be sure to enable the POP service first in your email's mailbox, as the setting interface is different between each email address.
How to set up email on the NVR (take [email protected] as example):
| Field | Value |
|---|---|
| Enable E-mail function | On |
| SMTP Provider | hotmail |
| Sender | [email protected] |
| Password | password of your mail [email protected] |
| SMTP Server | smtp.live.com |
| Port | 25 or 587 |
| Encryption type | TLS |
| Sendee 1 | the email you want to receive the email alert (can use the [email protected] or any other email you want) |
| Subject | NVR report |
| Interval | 30 seconds (you can set up the interval according to your requirement) |
Please click "Test" first before you apply the setting. It reports "E-Mail Test success" if the setup is successful.
4) Set up phone app notification
Take the free app "EseeCloud" for example. Enter your app account → "Person center" → "Settings" → enable "Push notification", and you'll receive a push notification when movement is detected. Enter your app account → "Person center" → "privacy setting" → enable all permission. Enter your app account → "Notifications" → "Email" → enable.
5) Set up siren notification
Enter your phone settings → Notifications → find the app "EseeCloud" or "YESKAMO" → Enable it.
5. How to add a new camera to the YESKAMO NVR via Ethernet cable
In case the camera loses connection with the WLAN accidentally, or you want to add a new camera to the NVR system, please just match the code the camera with the NVR as below steps:
- Take the camera near the NVR recorder.
- Plug the camera to the NVR with the provided Ethernet cable; the LAN indicator light at the back of the NVR will turn on.
- Right-click the mouse to enter main menu → Video Manage. The upper-box shows online information; click the search code (button at the bottom of the interface), then click "match code", and the camera will be added to the NVR.
- Disconnect the camera from the wired cable then connect it to the WLAN system.
6. How to view the cameras on a computer (CMS)
You can view the cameras on a computer with the CMS EseeCloud software (download from www.yeskamo.com).
Note
For MAC system and Windows systems different from the one in this CMS software, please download the CMS software from www.yeskamo.com directly to get the latest CMS software.
Install and log in. Run the CMS software. Install the software on your computer and log in. Default user name: admin. Default password: no password, leave it blank/empty, and click "Login".
Add device. Click "add" on the top right corner of the computer management software → "Cloud ID" → input device information and click "Finish" to add the camera system to the CMS client. You only need to change the Cloud ID, User-name & Password (same as the NVR monitor), Device name and Number of channels (default 1; please revise it depends on your NVR channel, 4CH or 8CH).
View camera on computer. After you add the device cloud ID successfully, please double-click the device cloud ID to open all channels or double-click each channel one by one to get the videos.
7. How to playback the recorded footage on a computer
Install and add the device cloud ID on the CMS client (refer to "7. How to remotely view the camera on computer"). Log in the CMS → Add Device → Playback → click "Confirm" with the dialogue window. Then choose channel → choose date and click "Retrieval" to playback.
8. How to backup video footage on a computer
Click "Playback" icon at the toolbar, then choose channel, then click "Download". Here please choose the footage you need, click download icon below "Operate", and the notification will pop up with the file store path.
9. How to play the backup footage on a computer
Run the "Pot Player" to play backup software (refer to "9. how to backup video footage on computer"). To install the "Pot Player": run the "Pot Player" → click the "main menu" on the top left corner → click "Open File" → choose the backup file, and click "Open". Then you can view the backup footage freely. (If you want to play the backup file on your computer, please contact us directly to get "Pot player".)
10. How to playback recorded footage on the monitor
Right-click the mouse to enter main menu → Video Playback — here you can choose date, channel, record mode, time range, then click "search" to find the exact video based on your search condition.
- Playback can be controlled through the playback process bar.
- You can only playback video of 1 channel at one time.
- You can choose viewing mode: by Day or by Hour.
11. How to backup video footage on the monitor
- Connect the USB disk to the rear of the USB port of the NVR monitor. (The USB disk format must be FAT32.)
- Right-click the mouse to enter main menu → Video Backup.
- Choose "Channel, Recorder Mode, Search Time", and then click "Search" and get the recorded video list 1 channel video to backup.
- Select the file you want to backup and click "Backup" button.
12. How to playback recorded footage on the phone app
Run and add the device cloud ID on phone app (refer to "2. how to remotely view the camera on the phone app). Double-click the channel you want to playback → click "Playback" → click "Calendar" to choose date and time → click "Confirm" → click "Play" button to playback the video on the phone app.
13. How to avoid repeated motion detection alerts
The motion-triggered alerts generated when the camera detects any movement and you get an instant alert for this movement. But sometimes there could be too many alerts. Please try to set up the motion detection area to avoid unnecessary repeated alerts. Right-click the mouse to enter main menu → System Setup → Channel Setup → Video Detection → Area Edit.
When you select the motion detection zone, please right-click mouse → Clear all → edit the motion detection area → "Return" → "Apply" and "OK" to save the setting. When movement happens in the clear area, it won't trigger any alarm. When movement happens in the blue detect area, you will get motion detection alerts.
14. How to change the YESKAMO system password
Default user name is admin; default password is no password (leave it blank). To change the password, right-click the mouse to enter main menu → System Setup → System Admin → User → Set Password → New Password.
Note
New password must be NO more than 10 characters, and NO special character is allowed.
15. What to do if you forget the new password
Default user name is admin; default password is no password, leave it blank. If you've changed the password and forget it:
- Click "OK" and it will show "User Name/Password is incorrect".
- Move the mouse arrow to anywhere on the interface that pops up (don't click "OK" here).
- Then click left mouse button and click right mouse button, click left and click right… repeat several times, until you get a new interface "Restore default user…".
- At the last interface, you can reset a new password or you can click "Ok" directly and the system password will be the default password again (no password).
16. How to reset the NVR system to factory setting
Right-click the mouse to enter main menu → System Setup → System Admin → Factory Setting → click "Apply" and the NVR monitor system will be reset to factory setting.
17. How to set up the time and date of the NVR monitor
The NVR monitor setting time is Beijing Time (+08:00); please change it to your local time. Right-click the mouse to enter main menu → System Setup → General Setup → Time Setup → edit Time Zone → click "Apply" to save the setting. (e.g. for Time Zone London +00:00, Beijing +08:00, New York −05:00.)
Note
In case you are using YESKAMO Wi-Fi NVR system and the NVR system upgrade automatically when this device is online, your camera will not function during the upgrade. Please wait for the upgrade to finish.
18. How to upgrade the YESKAMO NVR monitor system
- Copy the NVR firmware.bin file to the USB flash disk's root directory, not in any folder.
- Plug the USB flash disk to the NVR monitor's USB port (USB flash format should be FAT32).
- Right-click the mouse to enter main menu → System Setup → System Admin → System Upgrade.
- Choose USB upgrade, and then click "Start" button.
- You can see the system condition in the process bar, waiting for the system to finish upgrading and it will reboot automatically when finish. The whole process about 1 minute, please wait patiently.
19. How to upgrade the camera
Copy the camera firmware.bin file to the USB flash disk root directory, not in any folder. Plug the USB flash disk to the NVR recorder. Right-click the mouse to enter main menu → System Setup → HDD Setup → IPC Maintenance.
- A) After setting auto-support HDD into the NVR with the cables.
- B) The system condition shows in the process bar, waiting for the system to finish upgrading.
- C) All setting will back to factory default setting; please reset the NVR system again if you need.
20. How to install a hard drive for the NVR
The NVR monitor may include a hard drive inside. If you bought a NVR monitor without a hard drive or you want to replace the pre-install hard drive with a bigger size, please install a hard drive by yourself. Before you install the hard drive, please unplug the NVR recorder from the power source.
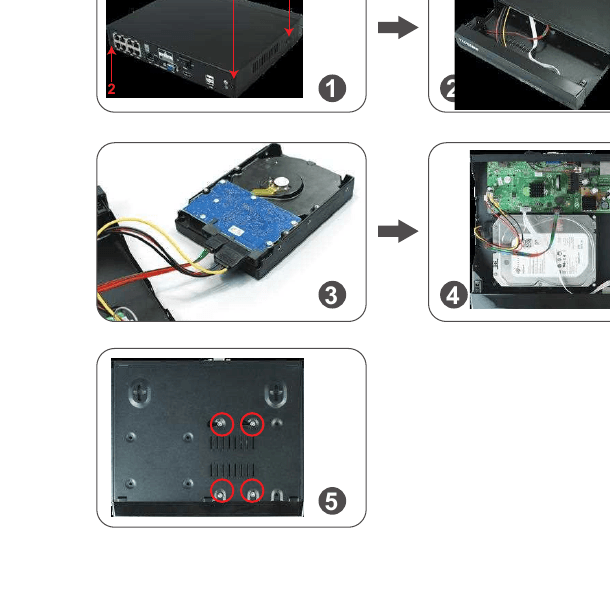
- Remove the four screws on the NVR recorder.
- Slide the top panel off from the NVR recorder.
- Connect the SATA power and data cables from the NVR recorder to the corresponding port on your HDD.
- Once connected, place the HDD into the NVR with the cables placed as shown.
- Holding the hard drive and the NVR panel, gently turn it over (so it is upside down) and line up the holes on the hard drive with the holes on the NVR panel. Screw the provided screws into the holes by a Phillips screwdriver (found in kit). Slide the NVR panel back on and fix the panel with Phillips screws.
Note
A NVR system can support included hard drive. If you bought a NVR monitor without a hard drive but want to replace the pre-install hard drive with a bigger size SATA hard drive (such as Seagate, WD, TOSHIBA…). After install the hard drive, please firstly format the hard drive disk before recording.
21. How to turn off the siren alarm from the camera side
There are 4 types of port available: Buzzer, E-Mail Notice, App notification, IPC Alarm, Split Screen and Drawn Region. You can customize the alerts based on your requirement. Take IPC Alarm as example: it sounds a siren alarm from the camera side when human motion is detected.
Please note, the default channel is channel "1", revise the channel if you need to setup other channels, such as channel "2 8". Right-click the mouse to enter main menu → System Setup → Channel setup → "IPC Alarm" → Click "Apply" to save the setting.
Note
A) If you choose phone app or email alert for this camera, please make sure your camera system is online, so that you can receive the alerts. B) If you want to setup the same alerts for all channels, please repeat above steps or click "Copy to all".
22. How to turn off the floodlight at night
This floodlight camera has a built-in AI sensor and floodlights. The floodlight will automatically switch on at night when it detects any suspicious activities and offer true color videos. But you can customize the IR-Cut mode to turn off the floodlight.
Before customizing the IR-Cut mode for a selected channel, please double-click the selected channel to enter full screen mode. Right-click the mouse to enter main menu → Color Adjust → IR-Cut mode: Infrared mode, Smart Mode, full color mode, daylight, night → click "Ok" to save the setting.
| IR-Cut Mode | Floodlight Camera — Day | Floodlight Camera — Night | Standard Camera — Day | Standard Camera — Night |
|---|---|---|---|---|
| Infrared | Color Picture | Black & White, floodlight will never turn on | Color Picture | Black & White |
| Daylight | Color Picture | Totally black once ambient light is insufficient, floodlight will never turn on | Color Picture | Totally black once ambient light is insufficient |
| Night | Black & White | Black & White, floodlight will never turn on | Black & White | Black & White |
| Full Color | Color picture | Color picture, floodlight always turns on at night | Color Picture | Totally black once ambient light is insufficient |
| Smart | Color picture | Black & white when no one passes by, and floodlight switches on to offer color video once someone passes by and AI activated | Color Picture | Black & White |
Note
- A) The light of the floodlight camera lasts for about 20 seconds.
- B) The time interval for the floodlight is about 2 minutes.
- C) Only under the "Full color" mode and "Smart" mode, the floodlight will turn on when AI detects people in the monitoring area.
FAQ
Afterword
Incorporated in Shenzhen in 2006, YESKAMO has been a world-leading brand of home security camera system provider. With the latest security technology, we are dedicated to providing price-reasonable and user-friendly security camera kits for home and business use. YESKAMO provides customized technical support and a professional end-to-end solution within 24 hours.
Technical Support
| YESKAMO | |
|---|---|
| Website | www.yeskamo.com |
| [email protected] (for US) / [email protected] (for UK) | |
| Tel | +1 830 745 5888 (US) / +44 20 3807 4763 (UK) |
Floodlight IP Camera — User Manual
Full user manual for the YESKAMO PIR Motion Activated Alarm Camera with Floodlight — product description, installation angle, app configuration, device setup, FAQ, and support.
YESKAMO 室內 IP 攝影機 — 使用手冊
YESKAMO 室內 Wi-Fi IP 攝影機(雪人款與小小兵款)的完整使用手冊,涵蓋各部位名稱、App 設定與配對、PTZ、移動偵測、microSD 錄影、安裝、電腦端監看與保固。